
- Access Requests: people asking to open a page they’re blocked from (Admins and the Owner only, and only when there’s a request waiting).
- Pending Invitations: invites that haven’t been accepted yet.
- The roster: everyone on the team, with their role and last login.
You can view, but only admins can invite, assign roles, or change status.
A company can have more than one Owner. Everyone who’s an Owner shows as Owner on the roster, and each Owner can manage everyone on the team, including the other Owners.
Invite a user
1
Open the form
In Settings → Company → Users, select Invite user.
2
Fill it in
- Email is required.
- Full name (optional).
- Role starts on Door Expert.
- Environment starts on Sandbox only. You can also pick Production only or Both.
- Note (optional) is an internal note about the invite. The invitee doesn’t see it.
3
Create it
Select Create invitation. It shows Creating… while it saves.
4
Check that it was emailed
Field Ops emails the person a set-your-password invite right away. You’ll see Invitation emailed to their address, and the invite link still shows (expires in 14 days) in case you want to send it yourself too. Select Done when you’re finished.
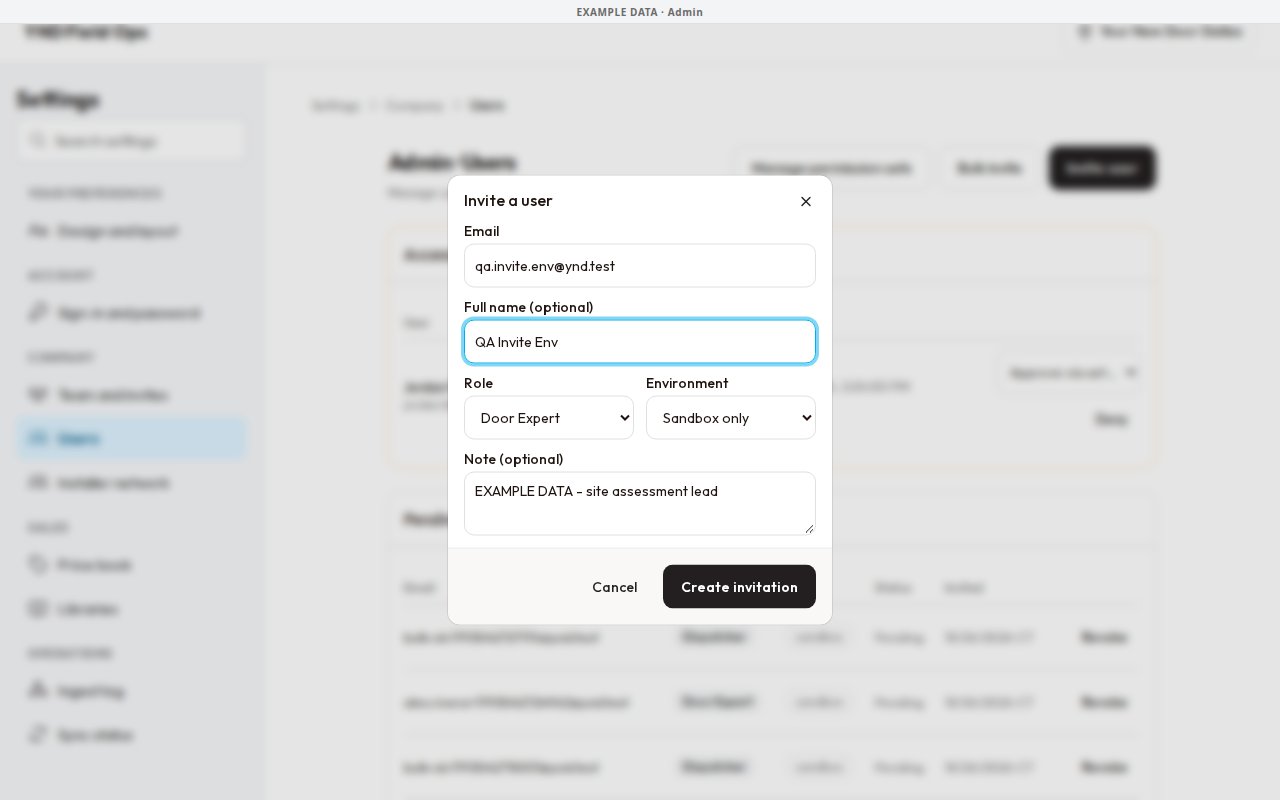
Invite a user, with Environment and Note (example data)
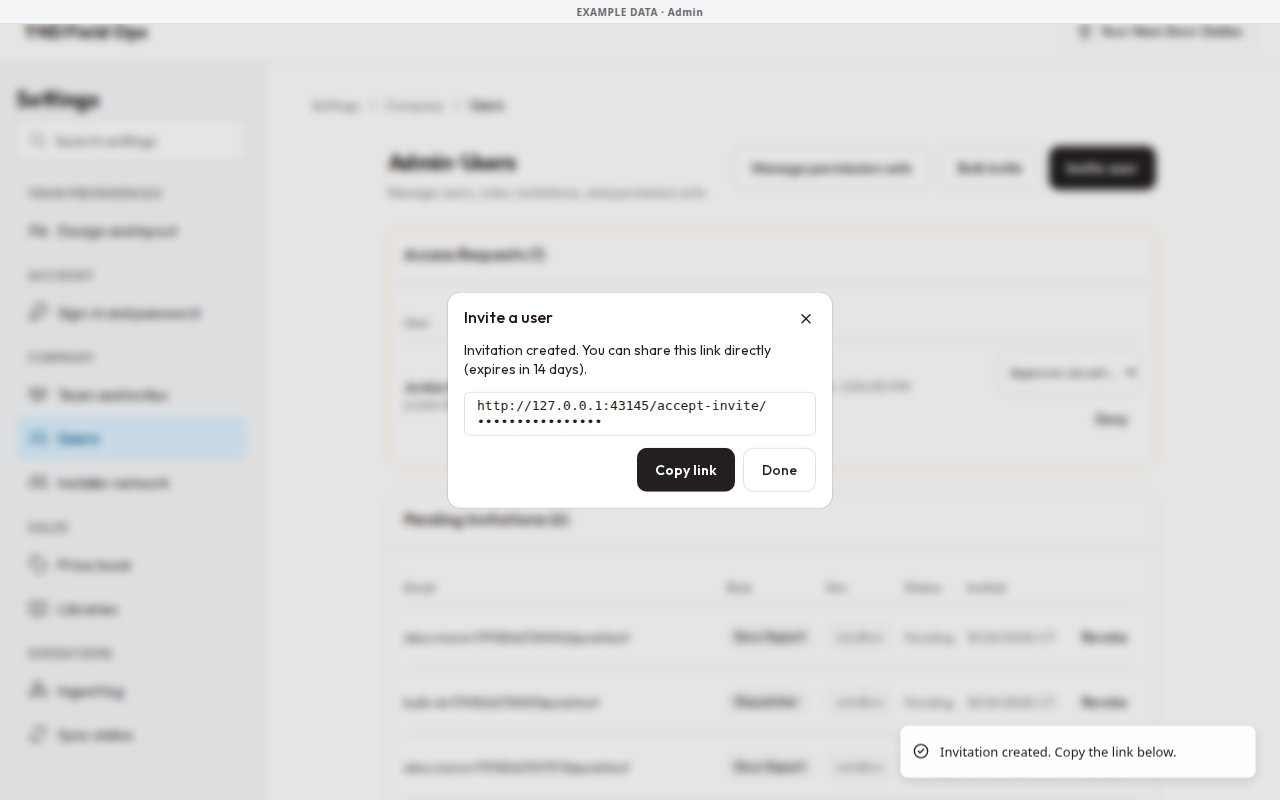
The invite link after Create invitation (example data)
Create invitation sends the same set-your-password email that Resend invite sends. Before that, creating an invite never emailed anyone, so if you invited someone before then and they never got an email, use Resend invite or send them the link.If you see Invitation created. Copy the link below. instead, the email didn’t go out. The invite is still pending and the link works, so select Copy link and send it yourself, or try Create invitation again for the same email.
If the invite doesn’t go through
If the same email already has a pending invite that hasn’t expired, Create invitation refreshes it instead of making a second one: the old link stops working, a new 14-day link is made with the role, environment and note you just picked, and the email goes out again. If an older invite for the same email has expired, it’s revoked automatically when you send the new one.
Test and QA accounts only get invite emails at
@ynd.test addresses, the same as Resend invite. For other addresses, no email is sent and you’ll get the link to copy instead.Bulk invite
Use Bulk invite to add several people at once.1
Paste the list
Select Bulk invite and paste one person per line as
name, email, role, for example Jane Doe, [email protected], Door Expert. Commas or tabs both work, and a CSV header row is okay.2
Pick the environment
Environment (applies to all) sets the same environment for everyone on the list.
3
Send
The form shows Ready to invite and the count. Select Send invitations.
4
Share the links
Each row shows Copy invite link, or the reason it failed. Copy all links copies every link at once.
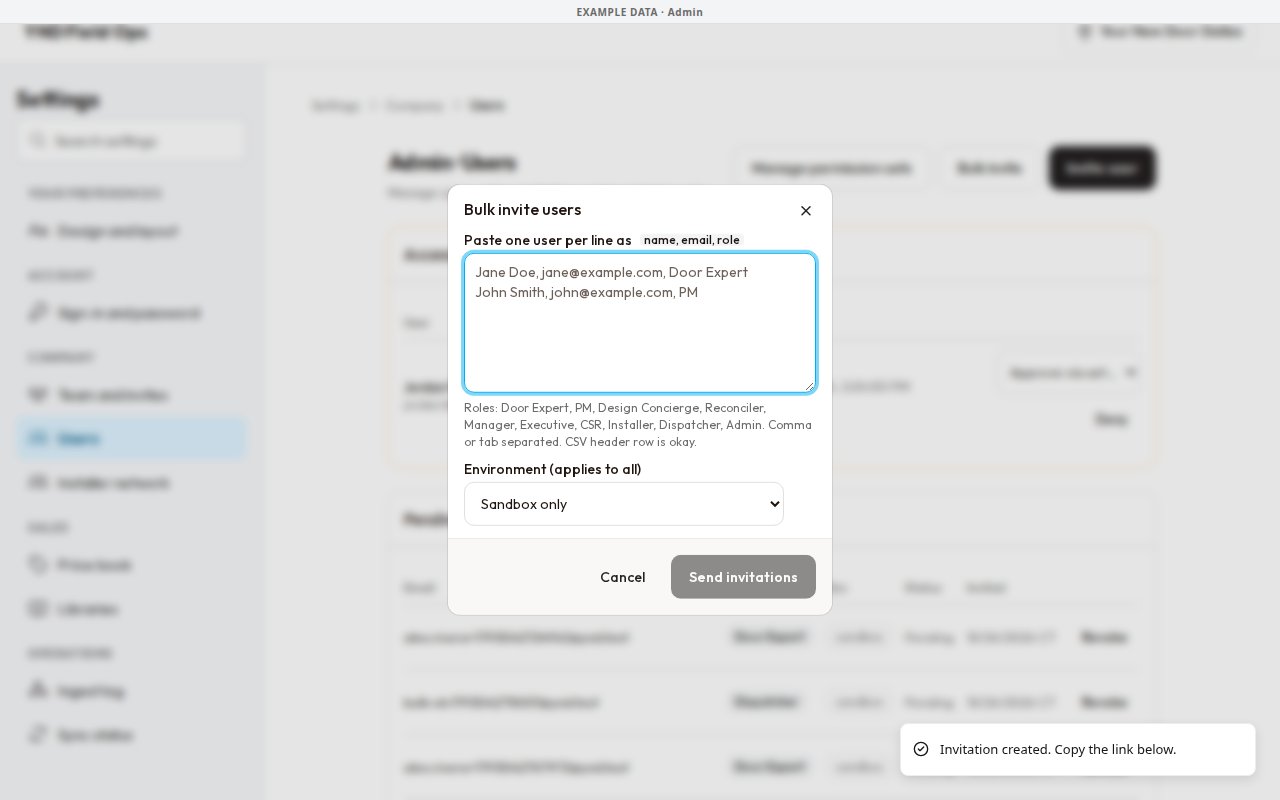
Bulk invite users (example data)
Roles you can choose
The roles, in the order they appear:The Owner role is never offered on the invite form. Installer isn’t offered here either, because an installer needs a market. Invite installers from Team and invites.
Pending invitations
Pending Invitations lists every invite that hasn’t been accepted, with its Email, Role, Env, Status, and when it was sent (Central time). If there are none, you’ll see No pending invitations. An Admin or the Owner can select Revoke on a pending or expired invite. The link stops working right away and you’ll see Invitation revoked. Managers can see this list but can’t revoke.Accepting an invite
When the person opens their link they see You’re invited to YND OS, with the role, the environment, and the email the invite was sent to.1
Sign in or create an account
They sign in, or create an account, using the same email the invite was sent to. Google sign-in works too.
2
Accept
They select Accept invitation, see Invitation accepted, then select Continue.
Creating a new account from the invite
New people can create their account right on the invite page. They pick a password, and Field Ops creates the account, signs them in, and accepts the invite in one go. They see Invitation accepted and land on the home page. There’s no confirmation email to wait for. This only works through an invite link. Field Ops still doesn’t allow open sign-ups, so someone without an invite can’t create an account.Each invite link works once. After it’s accepted, the link shows This invitation was already accepted.
If they never finished the invite page
Someone with a pending invite doesn’t have to go back to the invite link. They can go to the regular Field Ops sign-in page, type the email the invite was sent to, and use Email me a sign-in link or Forgot password. The email now goes out (before, nothing was sent until the invite was accepted). When they sign in from that email, Field Ops finishes the invite for them automatically:- Their account is created with the role, environment, employment type and portal from the invite.
- The invite is marked accepted and drops off Pending Invitations.
- They’re signed in and land in Field Ops.
This only works for an invite that’s still pending: not expired and not revoked. If the invite has expired or was revoked, no email is sent, so send them a new invite. People who’ve been switched off or deleted are still refused. The usual limits on sign-in and reset emails haven’t changed.
Access requests
When a signed-in person lands on a page they don’t have access to, they can type an optional reason and select Request access from admin. They’ll see Your request has been sent. An admin will review it shortly. Admins and the Owner see the request at the top of Users under Access Requests, with the person, the page, their reason (or No reason given), and when they asked.- Approve gives that one person access to that page. It’s saved as a per-person permission, so their role doesn’t change.
- Deny turns the request down.
Per-person permissions
When you edit someone, the Permissions section lets you override what their role gives them, one permission at a time: Inherit role, Allow, or Deny. Role grants still apply unless you deny them here. You can’t set Deny on an Owner, so an Owner never loses access through a per-person override. To change what a whole role can do, use Manage permission sets instead.The roster
Each person’s row shows their role, email, and Last login (Central time, or never if they haven’t signed in). People who’ve been switched off show an Inactive badge.Resend an invite
If someone never got their invite email or lost it before signing in, an Admin or the Owner can send it again from the roster.1
Find the person
In Settings → Company → Users, find the person who hasn’t signed in yet.
2
Open the row menu
Select the ⋯ button at the end of their row.
3
Resend
Select Resend invite. It shows Sending… for a moment, then a message right on the page confirms it, like Invite sent to their email at 3:30 PM CT. If it didn’t go through, the reason shows in the same spot.
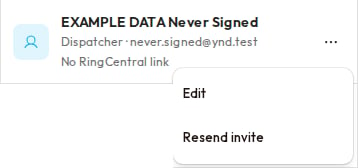
The row menu with Resend invite (example data)
Limits
Every attempt counts toward these limits, even one that didn’t go through. If the email can’t be sent, you’ll see Couldn’t send the invite. Try again in a minute.
Test and QA accounts only get invite emails at
@ynd.test addresses. For any other address, the resend is skipped and nothing is sent.Send a password reset
An Admin or the Owner can email a password reset to someone who already has a login, for example when they’re locked out or forgot their password.1
Open the row menu
In Settings → Company → Users, select ⋯ at the end of the person’s row.
2
Send it
Select Send password reset. It shows Sending…, then a message on the page confirms it, like Password reset sent to their email at 3:30 PM CT.
3
They pick a new password
The person gets the same reset email they’d get from Forgot password on the sign-in page, and follows the link to choose a new password.
Resets sent from Users count toward the same limits as Forgot password, so if several were just requested for that person, you may need to wait before sending another.
Delete and restore a user
Deleting someone removes their access without losing any history. An Admin or the Owner can do it.1
Open the row menu
Select ⋯ on the person’s row, then Delete user.
2
Read the warnings
The dialog explains that they lose access right away, are signed out on every device, and won’t show up when you assign work or route calls. Their jobs, calls, notes, payments and reports stay, with their name marked (deleted).If they have upcoming appointments or open jobs, you’ll see a warning with a See their upcoming work link so you can reassign it. If they’re set to receive calls, deleting turns that off and takes them out of the call rotation.
3
Confirm
Type their name exactly. When it shows Name matches, select Delete user. You’ll see was deleted with their name.
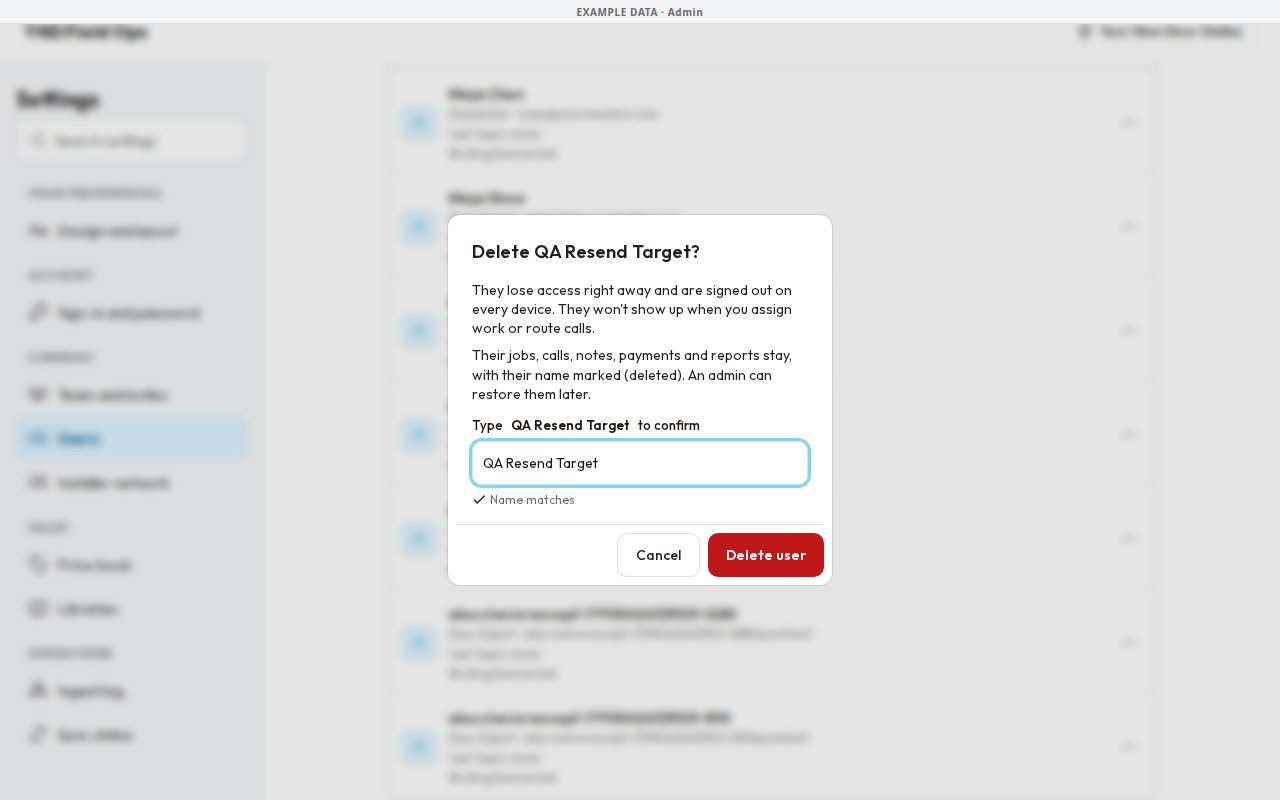
Delete a user, with the type-to-confirm box (example data)
When you can’t delete someone
Restore someone
Tick Show deleted at the bottom of the roster to see the Deleted section. Each row shows who deleted the person and when. Select ⋯ → Restore user to bring them back. Only an Admin or the Owner can restore.Related
Roles: who can do what
What each role can open and do.
Settings, users and sign-in
Role access and sign-in.
Quickstart: admins
Set up your team on day one.